Streaming is now everywhere, an indispensable part of our daily lives, used by almost everyone for entertainment, communication, and learning. It appears effortless, almost magical, as high-quality video instantly appears on our screens. But beneath that seamless playback lies a complex and fascinating architecture of web technologies. Have you ever wondered what truly happens behind the frame to bring those pixels to life, adapting to your network, and ensuring a smooth experience right within your browser? Join us as we pull back the curtain and demystify the magic of modern web video playback.
Let’s say you want to create a player to watch your favorite TV Show.
First step will probably be to create a page where you will add the famous video tag, give it a source and maybe display the controls so you can interact with it. You will end up with something like this:
<video src="my-awesome-video" controls></video>
Your video will probably play well, but depending on, for example, the video size or your connection, you might have some performances issues.
That’s where the Media Source Extension API comes to save the day.
💡 Media Source Extension
“MSE gives us finer-grained control over how much and how often content is fetched, and some control over memory usage details, such as when buffers are evicted.” - MDN Web Docs
Here MDN tells us that MSE allows us to better control the flow of the stream.
This means new features are now available!
Going back to my previous use case, what if I want to play Dune in 4K? It is going to be a super heavy file and if I give it to my video tag, it might download the entire file before being ready to play the content.
Do I want to wait to watch my movie? Of course not! I’m already on the sofa with my ice cream ready for it to start 🍦
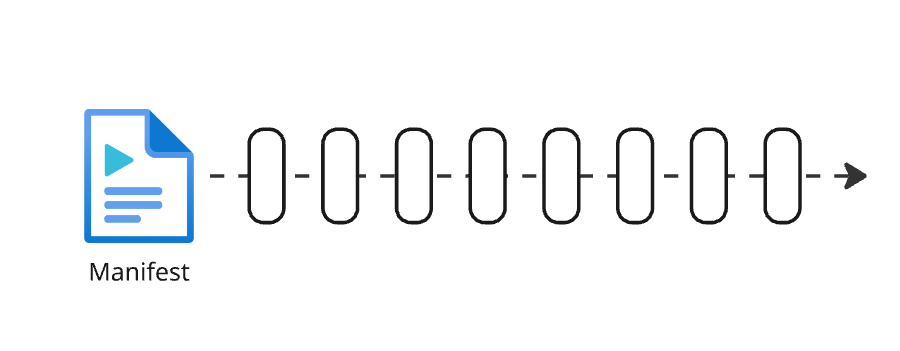
MSE helps us manipulate specific video file formats such as Dash (Dynamic Adaptive Streaming over HTTP) or HLS (HTTP Live Streaming). Those formats split a video into lists of chunks and allow playing a short section of the video at any timecode. Those chunks are referenced in a manifest, .mpd for DASH and .m3u8 for HLS.
That’s not all! Those manifest can transport additional informations.
We can now have a list of chunks based on specific settings such as the resolution, a recommended bandwidth per list, a link to subtitles and many more!
Having multiple playlists based on the resolution brings a new acronym (I know what you think another one). We can now talk about Adaptive Bitrate Streaming (= ABR). This adds the feature of switching qualities based on the user bandwidth to our player 🤩
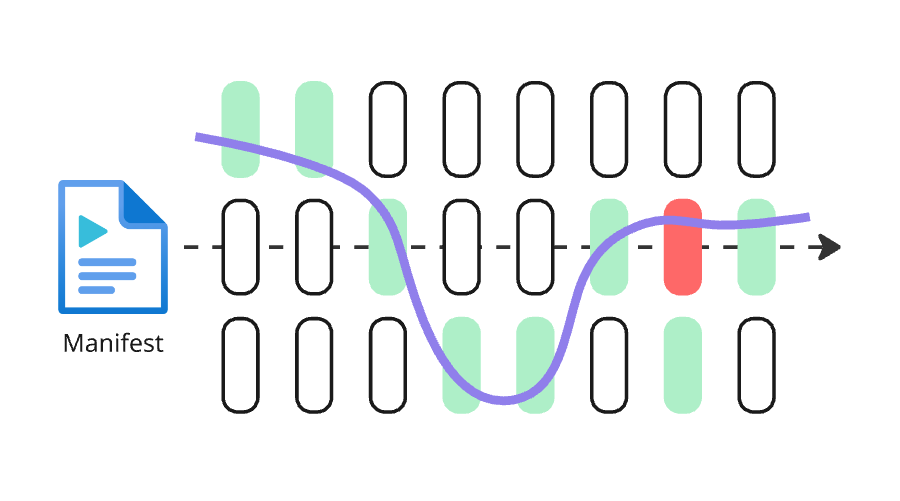
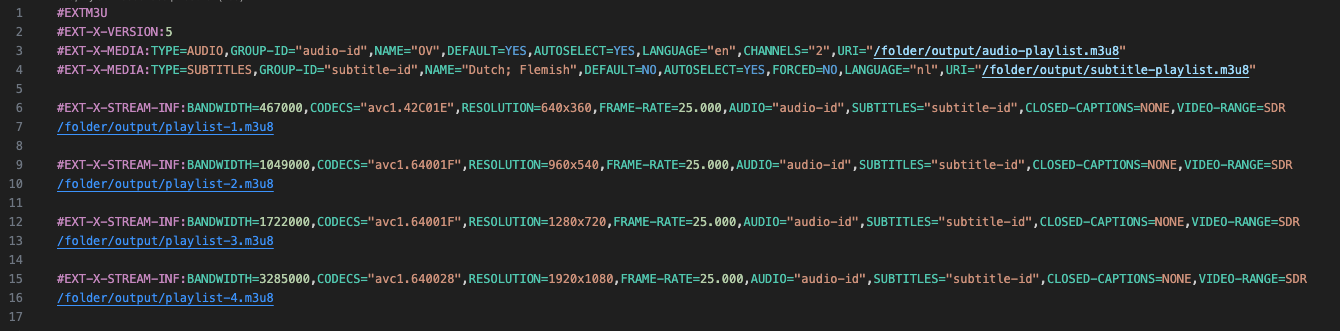
Here is below an example of an HLS manifest where you can see the playlist links to specific resolutions as well as links to the audio file and the subtitles.
🤔 How to use it?
Here I will be building a player component in JavaScript using React.
Step 1
We start by creating a player component with a video tag.
export const Player = ({ source }: { source: string }) => {
  return <video src={source} title="Video player" controls />;
};
Step 2
Now we want to add a MediaSource to handle our manifest.
Also, to better manipulate our video tag we use the useRef hook from React.
import { useEffect, useRef } from "react";

export const Player = ({ source }: { source: string }) => {
  const playerRef = useRef<HTMLVideoElement>(null);

  // MediaSource instance
  let ms: MediaSource;

  useEffect(() => {
    ms = new MediaSource();

    // Link the MediaSource to the video tag
    playerRef.current!.src = window.URL.createObjectURL(ms);

    // 1 - Handle the sourceopen event
    ms.addEventListener('sourceopen', onMediaSourceOpen);
  }, []);

  return (<>
    <video title="Video player" controls ref={playerRef} />
  </>)
}
Step 3
Now we need to add a SourceBuffer to handle each segment of our video.
import { useEffect, useRef } from "react";

export const Player = ({ source }: { source: string }) => {
  const playerRef = useRef<HTMLVideoElement>(null);

  let ms: MediaSource;

  // SourceBuffer instance
  let videoSourceBuffer: SourceBuffer;

  // 1 - Define the SourceBuffer
  const onMediaSourceOpen = () => {
    videoSourceBuffer = ms.addSourceBuffer('video/mp4; codecs="avc1.42c01e"');

    // 2 - We fetch the next video chunk after each SourceBuffer update
    videoSourceBuffer.addEventListener('updateend', nextVideoSegment);

    // 3 - We fetch the first segment (init)
    fetch(segmentInitVideo, appendToVideoBuffer);
  };

  useEffect(() => {
    ms = new MediaSource();

    playerRef.current!.src = window.URL.createObjectURL(ms);

    ms.addEventListener('sourceopen', onMediaSourceOpen);
  }, []);

  return (<>
    <video title="Video player" controls ref={playerRef} />
  </>)
}
Here is the final version with the nextVideoSegment and appendToVideoBuffer methods.
import { useEffect, useRef } from "react";
import { parseManifest, fetch } from './player.utils';

export const Player = ({ source }: { source: string }) => {
  const playerRef = useRef<HTMLVideoElement>(null);

  let ms: MediaSource;

  let videoSourceBuffer: SourceBuffer;

  let indexVideoSegment = 1;

  // 1 - You will need to parse the manifest to get the init segment as well as all the segments
  const { video: { segmentInit: segmentInitVideo, segments: segmentsVideo } } = parseManifest(source);

  // Here we just append 10 chunks
  const numberOfChunks = 10;

  const onMediaSourceOpen = () => {
    videoSourceBuffer = ms.addSourceBuffer('video/mp4; codecs="avc1.42c01e"');

    videoSourceBuffer.addEventListener('updateend', nextVideoSegment);

    fetch(segmentInitVideo, appendToVideoBuffer);
  };

  useEffect(() => {
    ms = new MediaSource();

    playerRef.current!.src = window.URL.createObjectURL(ms);

    ms.addEventListener('sourceopen', onMediaSourceOpen);
  }, []);

  // 2 - nextVideoSegement to fetch a specific chunk and append it to the buffer
  const nextVideoSegment = () => {
    var url = segmentsVideo.replace('$Number$', indexVideoSegment.toString());

    fetch(url, appendToVideoBuffer);

    indexVideoSegment++;

    if (indexVideoSegment > numberOfChunks) {
      videoSourceBuffer.removeEventListener('updateend', nextVideoSegment);
    }
  };

  // 3 - appendToVideoBuffer will get the chunk in param and add it to the buffer.
  const appendToVideoBuffer = (videoChunk: Iterable<number>) => {
    if (videoChunk) {
      videoSourceBuffer.appendBuffer(new Uint8Array(videoChunk));
    }
  };

  return (<>
    <video title="Video player" controls ref={playerRef} />
  </>)
}
Step 4
Now that you should have a video playing you might realize that you don’t have sound on it. It is because we now need to do the same segment management with the audio.
You will then have a videoSourceBuffer and a audioSourceBuffer which will work just the same!
🎉 Congratulations!
You can now play a video like a pro! 🚀
🔎 What’s next?
To be honest if you don’t want to bother with all this chunk management, you can find libraries online that will handle it for you 😄
If you want to take a look at some, I would recommend to check:
Those are open source and they can help you build a player faster if you don’t want to handle everything on your own.
In a future article we will talk about content protection and the Encrypted Media Extensions API so stay tuned!